TA的每日心情 | 奋斗
2024-9-3 08:39 |
|---|
签到天数: 20 天 [LV.4]常来常往
|
一、安装依赖npm install --save @nestjs/swagger swagger-ui-express
如果使用fastify,安装fastify-swagger而不是swagger-ui-express:
npm install --save @nestjs/swagger fastify-swagger
二、引用安装完成后,在 main.ts文件中定义并初始化SwaggerModule类:
import { NestFactory } from '@nestjs/core';import { SwaggerModule, DocumentBuilder } from '@nestjs/swagger';import { AppModule } from './app.module';async function bootstrap() { const app = await NestFactory.create(AppModule); // swagger 配置 const config = new DocumentBuilder() .setTitle('Cats example') // api文档标题 .setDescription('The cats API description') // api文档描述 .setVersion('1.0') // api文档版本 .addTag('') // 标签 .addBearerAuth() // token鉴权 .build(); const document = SwaggerModule.createDocument(app, config); // setup第一个参数为访问路径(如:http://localhost:3000/api),一般不用api,替换成api-docs,防止跟接口冲突 // SwaggerModule.setup('api', app, document); SwaggerModule.setup('api-docs', app, document); await app.listen(3000);}bootstrap();
这样打开就基本能看见一个正常的接口文档网页了。
  编辑 编辑
三、生成类型和参数DTOSwaggerModule会自动收集@Body(), @Query(), 以及@Param()装饰器的参数来生成API文档。
在Dto上使用ApiProperty()添加参数注释:
import { ApiProperty } from '@nestjs/swagger';export class CreateUserDto { @ApiProperty({ description: '用户名', default: 'a' }) username: string; @ApiProperty({ description: '密码', default: '123456' }) password: string;}
@Post()async create(@Body() createCatDto: CreateCatDto) { this.catsService.create(createCatDto);}
  编辑 编辑
四、添加请求头:token在 main.ts swagger中配置是添加了addBearerAuth(),即可在路由控制层controller中直接使用
import { Controller, Body, Post, BadRequestException, UseGuards,} from '@nestjs/common';import { ApiTags, ApiOperation, ApiBearerAuth } from '@nestjs/swagger';import { UserService } from './user.service';import { CreateUserDto } from './dto/create-user.dto';import { SearchUserDto } from './dto/search-user.dto';import { JwtAuthGuard } from 'src/auth/guard/jwt-auth.guard';import { Roles } from 'src/rbac/role.decorator';import { Role } from 'src/rbac/role.enum';@ApiTags('用户')@ApiBearerAuth() //token鉴权@UseGuards(JwtAuthGuard)@Controller('user')export class UserController { constructor(private readonly userService: UserService) {} @ApiOperation({ summary: '创建用户' }) @Post('create') @Roles(Role.CreateUser) async createUser(@Body() createUserDto: CreateUserDto) { const user = await this.userService.findOneByName(createUserDto.username); if (user) { throw new BadRequestException({ msg: '此用户已存在~', success: 0 }); } const result = await this.userService.createUser(createUserDto); if (result) return { msg: '创建成功!', success: 1, data: result }; return { msg: '创建失败', success: 0 }; }}
在 swagger中使用
① 点击右上角的锁
  编辑 编辑
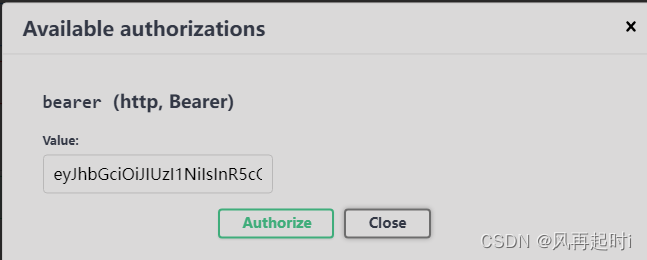
② 添加token
  编辑 编辑
ok了!
官网文档中还介绍了ApiHeader()等应该是用来添加自定义请求头的。addBearerAuth()才是添加Authorization请求头的。
更多操作请参考官网::https://docs.nestjs.cn/8/openapi
|
评分
-
查看全部评分总评分 : 金币 +60
|